
Overview
OAuth 2.0 is the recommended way to authenticate to the Ambassador V2 API. You generate a client ID and client secret once, exchange them for a short-lived access token, and send that token as an Authorization: Bearer header on every API call. It replaces the older approach of putting a username and API key directly in the request URL.
Product overview (non-technical)
What changed and why it is better
- Nothing secret in the URL. Your access token travels in a request header, not in the address, so it does not end up in server logs or browser history the way a key in the URL can.
- Tokens expire on their own. Each token is short-lived. If one is ever exposed, the window of risk is small.
- You can rotate without downtime. If a secret is compromised, you issue a new one instantly. Your client ID stays the same.
What you need
- An Ambassador account with API access enabled. Your Customer Success contact can confirm this.
- A client ID and client secret, which you generate yourself in the admin (see the developer guide below).
- A server that can make HTTPS requests. All calls are server-to-server; none of this belongs in a browser or mobile app.
Turning it on and moving over
- OAuth is off by default. Ask your Customer Success contact to enable it for your account.
- Turning it on does not switch off your existing username and key. Both work at the same time, so you can move over one call at a time and keep the old method as a fallback while you test.
- If you are new to the Ambassador API, there is nothing to migrate; you start on OAuth directly.
Prebuilt integrations (Salesforce and similar)
OAuth is for API integrations you build yourself. If you connect to Ambassador through a prebuilt integration such as the Salesforce package, keep using your existing API credentials for it; those integrations do not use OAuth yet. Move a prebuilt integration to OAuth only once it adds support for it.
Developer integration guide
How the flow works
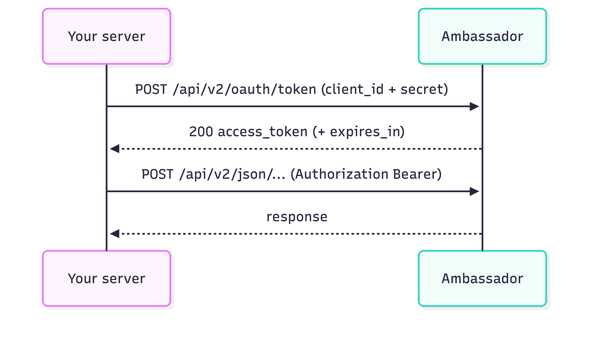
Step 1: Get your credentials
- In the Ambassador admin, go to Settings, then API Credentials, and open the OAuth section.
- Click Generate. Your client ID and client secret are shown.
- Copy the client secret and store it somewhere safe. It is shown only once and cannot be retrieved again.
- If you ever lose or need to replace the secret, click Rotate. The client ID stays the same and the old secret stops working immediately.
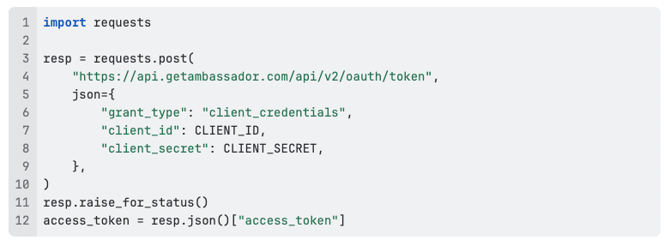
Step 2: Exchange credentials for an access token
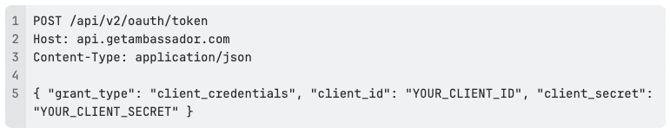
A successful response returns your token and its lifetime in seconds:

In Python:
Step 3: Call the API with the token
Send the token in the Authorization header. There is no username or API key in the URL.
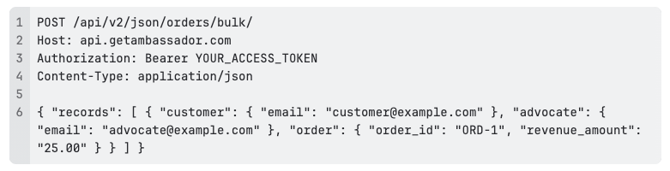
In Python:

Token lifetime and caching
Cache the token and reuse it until it is close to expiry, then request a new one. Do not request a fresh token on every call. The expires_in value (in seconds) tells you how long the token is valid.
Error responses
|
Status |
Meaning and what to do |
|---|---|
|
|
|
|
|
On the token endpoint, |
|
|
You are sending requests too quickly. Back off and retry after a short delay. |
|
|
|
Rate limits
The token endpoint and the API are rate limited to protect against abuse. Normal usage (one token, reused until expiry) never hits these limits. If you receive a 429, slow down and retry with backoff.
Security Best Practices
- Keep the client secret server-side only. Never ship it in a browser, mobile app, or client-side code.
- Store the secret in a secrets manager or environment configuration, not in source control.
- Always call over HTTPS.
- Rotate the secret immediately if you suspect it has been exposed.
Need help?
Contact support@getambassador.com or see API documentation.