
Overview
If Ambassador is hosting your landing page, you can brand the URL with your own domain by creating a landing page subdomain. Example landing page domain: register.companydomain.com or advocateprogram.companydomain.com
Once the landing page domain is configured and verified, you can create a landing page hosted by Ambassador and apply the domain to generate the URL. After creating your landing page url, you’ll use the Landing Page editor and Widget editor to create the landing page layout and design. Once the page is published, assign it to the applicable campaigns within the Ambassador or Customer experience sections.
Note: Each Ambassador-hosted landing page needs its own unique landing page domain.
Don’t have a resource to create a landing page domain? No problem! You can use an Ambassador domain instead. Example: register.accountname.ambassadorpages.com
Keep in Mind: If you're using existing page on your website, or building a new one inside your own site or product for your program such as Ambassador program landing pages or referred customer landing pages, then you don't need to create a landing page domain. Those pages already live on your domain, so you'll simply create landing pages with those URLs that are not hosted by Ambassador and assign them to the applicable campaigns.
Step 1: Create your domain
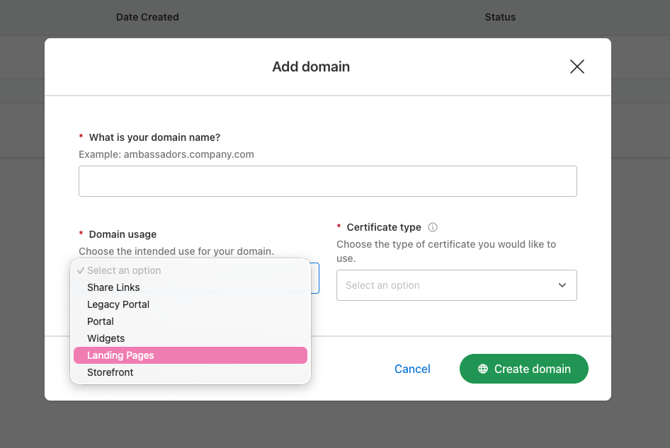
- In Ambassador, go to Admin & Configuration > Domains, select the Custom Domains tab, then select Add Domain.
- Under What is your domain name?, enter the subdomain you want to use. If your website is companydomain.com, and you’re creating a program landing page for your advocates to learn about the program, register, and come back to participate - something like advocateprogram.companydomain.com works well.
- Under Domain usage, select Landing Pages.
- Under Certificate type, select Automatic.
- Select Create domain to start provisioning.
Back on the Custom Domains page, your new domain appears with the status Pending hostname validation. That means it's ready for the next step.
Step 2: Validate your hostname
Next, you'll prove you own the domain so Ambassador can serve your landing page through it. These steps happen in your DNS provider, not in Ambassador.
The exact screens vary by provider. We're using Cloudflare DNS in this example, but the same steps work anywhere.
- Check the box next to the domain you just created and select View Domain. A Domain Details dialog opens with the values you'll need.
- Create a CNAME record for your chosen subdomain, using the target shown in Domain Details.
- Create a TXT record named
_cf-custom-hostname.<yourdomain>, as shown in Domain Details. The content is the Hostname verification value. - Wait for the status to update. This usually takes 5 minutes to 4 hours.
When the status changes to Pending certificate validation, you're ready for the next step.
Step 3: Validate your certificate
Our custom domain provider issues a TLS certificate for your hostname. This is what tells browsers your landing page is secure.
- Find the Certificate verification name and Certificate verification value in the Domain Details dialog.
- Create another TXT record in your DNS. The name is the verification name, and the content is the verification value.
- Once the certificate is requested, the status changes to Certificate requested.
- Once it's issued, the status changes to Completed.
Tip: Validation can take anywhere from 15 minutes to several hours. The automated checks run less frequently as time goes on, so if you're waiting a while, that's expected.
Step 4: Apply the domain to a landing page
Creating the domain is only half the job. Now you'll tell a landing page to use it. This is the step that's easy to miss, so don't stop at Completed.
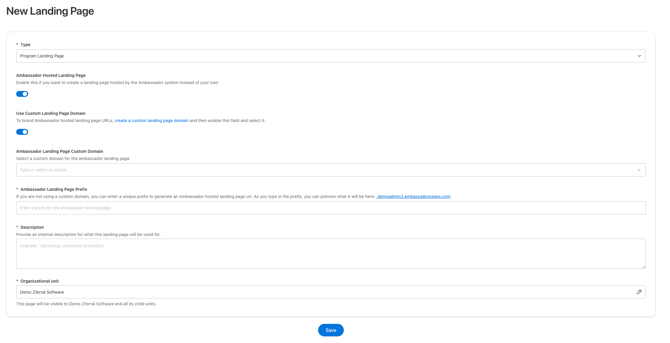
- Go to Library > Landing Pages and create a new landing page.
- Under Type, choose Program Landing Page or Customer Landing Page, depending on what you're building.
- Turn on Ambassador Hosted Landing Page. If this stays off, you're pointing to a page on your own site and no landing page domain is needed.
- Turn on Use Custom Landing Page Domain.
- Under Ambassador Landing Page Custom Domain, select your verified domain from the list. Only domains that have finished validating will appear here, so if yours is missing, check its status back on the Custom Domains page.
- Enter a prefix for the landing page. When a custom domain is applied, this is simply a backend requirement, as your domain will white label the URL.
- Fill in the Description with an internal note about what this page is for. Only your team sees this.
- Confirm the Organizational unit. This controls who on your team can see the page.
- Select Save.
Step 5: Use Landing Page editor and Widget editor to design and customize the layout of the page
After the landing page URL is created, you’ll use the Landing Page Editor to design and customize the layout of the page. We recommend starting with a landing page template and utilize the Widget editor to create widgets that embed or popup on the page.
Step 6: Assign the Landing Page to the Campaign(s)
Once your landing pages are complete and published, you can assign them to the applicable campaigns within the Advocate or Customer experience sections, depending on your needs.
No resource to create a landing page domain? Use an Ambassador domain instead
If setting up DNS records isn't an option right now, you can still launch an Ambassador-hosted page. Skip the domain step and go straight to Library > Landing Pages > Create your landing page and follow the prompts, leave Use Custom Landing Page Domain turned off and enter a prefix under Ambassador Landing Page Prefix instead.
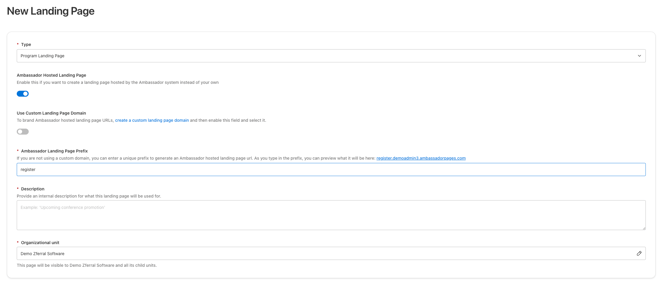
Ambassador appends the rest of the URL for you, and you'll see a live preview as you type. With a prefix of refer, for example, your full URL would look like: refer.youraccountname.ambassadorpages.com.
Question? Email support@getambassador.com
Related articles
- Landing Pages Overview
- Overview of Custom Domains